
Grape Version 1.11 Archival Information
The original Grape 1 WWV Doppler received was designed and components available between 2019 and late 2022. It has since been superseded by a new version with greater frequency range and better performance. See the Grape 1 page for complete details.
For complete information on how to build and operate the Grape V1.11, please refer to this paper: https://doi.org/10.1016/j.ohx.2022.e00289
For information on how to access, visualize and interpret data collected by Grape V1.11 Doppler receivers, please refer to this preprint: https://doi.org/10.5194/essd-2022-303
The following is archival information: This web page may be used by those who built the grape1 receivers who need help with details of construction and use of the Grape 1. In order to get an answer to a particular question, please email your question to Jim at RadioK4BSE@gmail.com (at a later date we will have a question submission form on this page). A good introduction may be downloaded at Intro Gen 1 Grape_Ver_1.1.pdf. The presentation may be previewed below. We encourage you to download this and read it now. Then see below for the lists of parts you will need.
Year 2022 Active Grape Stations
Getting Started
We want you to have a good time building and enjoying your Grape 1 receiver, and we need your valuable contributions to the project, but we also need to let you know of certain considerations when you are contemplating your build.
The Purpose
The receiver is a special-purpose receiver designed to record certain data you will measure from your location and submit to the HamSCI organization. This data will provide useful guidance for the scientists and engineers leading the project, and will help guide future stages of the project.
It has been said that the sound of progress is not “Eureka,” but rather is, “That’s funny; why did it do that?” Research is often a “messier” process than it is portrayed in books. When you start a research project, you don’t have all the answers to the questions you have posed – else why would you need to do research? This leads at times to going in a certain direction, only to find out that you hadn’t chosen the optimum direction for investigation, so you back out and partially redirect your efforts. You sometimes discover that the answers you want are available, but you need equipment that is more sensitive, has higher resolution, needs a better signal-to-noise ratio, or whatever. Or sometimes you discover that you were asking questions that were not quite the ones you should be asking in order to accomplish your goal. In this project, we benefit from a lot of previous research on the ionosphere, and we are plowing forward to get answers to remaining questions, such as how the ionosphere interacts with electromagnetic forces from outside of the earth (“space weather”).
What Is It?
Grape 1 is a step leading to the Grape 2, a more capable receiver, and eventually to the Tangerine SDR, a general purpose SDR with added capabilities that make it useful for this research. It will eventually be a modular SDR, with whatever capabilities prove useful. Grape is NOT a general purpose software defined receiver (SDR). It will not allow you to listen on the bands, because it is designed for specific data collection applications.
The Grape 1 is incomplete without a GPSDO (GPS Disciplined Oscillator) that can tune to the frequencies of 2.499, 4.999, and 9.999 MHz, each 1 kHz below a frequency used by radio stations WWV and WWVB, as well as several other time standard stations around the world. The Grape can also be used to tune to CHU, the Canadian standards stations. It needs a Raspberry PI processor with certain support circuits and special-purpose software, which software will be provided. Elsewhere on this web site you’ll find a list of what is needed.
The GPSDO acts as a very stable local oscillator (LO) for the receiver, with WWV (or another station on the same frequency, or CHU on its frequencies) as the carrier. The 1 kHz IF signal that results from mixing the LO and carrier is filtered and either recorded or further processed to yield a signal that contains propagation data of interest. For example, we can see in very small variations in the LO frequency, the effect of Doppler shift as the ionosphere goes up and down with the time of the day. Note that we cannot measure the ionospheres’s height, but only the change in height.
The part of the Grape 1 that must be assembled is the mixer and filter. The printed circuit board (PCB) you assemble supplies an analog audio signal for the Raspberry PI computer, which records the desired data and/or sends it to a server that acts as a repository for the data. It is then analyzed by project scientists to glean data needed to define certain reactions of the ionosphere.
The Mixer-Filter Board
The board that must be assembled uses very tiny surface mounted components in order to keep it small. The PCB itself is purchased from OSH Park, a custom PCB house, and the parts that go on it are purchased from Digikey or another component vendor. Other parts such as the Raspberry PI and sound interface can be purchased from Amazon or another vendor. You should know that the board, though small, is very dense and the components are VERY small. It is possible to assemble the PCB by hand, but it is somewhat tedious. Assembly requires patience and persistence. It is not a project for a beginner. You will need a good bit of soldering skill, and access to the right tools for working with surface mount components. These tools include a soldering iron with a very small tip, preferably temperature controlled, small diameter wire solder, a lighted magnifier or a low powered microscope, and several pair of tweezers.
Assembly directions are and will continue to be sparse and will assume prior experience and skill. There are no step-by-step assembly instructions. We have organized this help group to help guide you as you have questions. The members of the group are all volunteers with a good bit of experience, but we have never seen this project before either, because the whole project is new. You will be able to email your questions related to the assembly of the mixer/filter board, and using the completed project. We will answer you by email. Please allow a reasonable amount of time for an answer, as we are all volunteers ourselves, with the usual responsibilities and pressures, doing this as a labor of love. Unfortunately we are not able to diagnose problems with your PCB, and we are not able to repair PCBs that don’t work.
As we accumulate knowledge of the questions people have, we will assemble that knowledge into an FAQ section, which will be posted here, of course without any identifying information as to who raised the question.
Building the Board
First some hints for building the board, then the parts lists
- Use a pair of tweezers to hold the parts, and don't squeeze them too much, as holding it tightly will just give the part more energy to fly off when (not if) it slips out of your tweezers.
- The easiest way to solder parts on the PCB is to put solder on one pad then mount the part, soldering that lead first, followed by soldering other pins.
- We found it helpful to do your assembly in a large cookie sheet with low sides; the parts have a way of escaping from your tweezers, and the cookie sheet prevented the loss of many a part.
- You will need a very small tip on your soldering iron, and the soldering iron is preferably temperature controlled. We used the Hakko FX888D-23BY Digital Soldering Station and we like the Hakko T18-BR02 tip, but other irons and tips are just as good. Of course other places also sell these. Keep the tip VERY clean.
- The mixer IC can be put on the board two ways, the right way and the wrong way, rotated 180 degrees. There is a small white circle on the PCB near pin 1. The package may only identify the orientation by a slight slant on the edge of the package. It should be oriented with the slant toward the outside of the PCB. Looking from the top of the IC, the pin numbers progress counter-clockwise (clockwise if you look from the bottom of the IC), and pin 1 is on the side with the slant.
The following has already been made available to participants, but is presented here as a service for any new builders.
The parts list, with Digikey part numbers is below. John, N8OBJ, was kind enough to prepare a list for you. Of course you don't have to buy your parts from Digikey, just make sure that the parts have the same electrical and mechanical specifications. We STRONGLY suggest purchasing extra parts, as they have a habit of jumping from your tweezers and sometimes never being seen again.
| QTY | REF. DSGNS. | Digikey # |
| 6 | C5+C8+C9+C12+C17+C18 | 399-8000-1-ND |
| 3 | C3+C4+C6 | 399-17616-1-ND |
| 1 | C7 | 732-8077-1-ND |
| 1 | C11 | 732-7678-1-ND |
| 4 | C13+C14+C16+C19 | 445-5985-1-ND |
| 1 | C1 | 478-1364-1-ND |
| 1 | C10 | 732-8066-1-ND |
| 1 | C15 | 732-8068-1-ND |
| 1 | C2 | 732-8070-1-ND |
| 1 | R3 | P49.9CCT-ND |
| 1 | R2 | P402CCT-ND |
| 3 | R1+R9+R10 | P1.00KCCT-ND |
| 2 | R4+R5 | 311-10KARCT-ND |
| 1 | R6 | 541-121KCCT-ND |
| 2 | R7+R8 | 541-240KCCT-ND |
| 1 | D2 | 1N4001RLGOSCT-ND |
| 1 | D1 | ESD7L5.0DT5GOSCT-ND |
| 2 | L1+L4 | 490-6604-1-ND |
| 1 | L3 | 490-16851-1-ND |
| 1 | L5 | 490-11672-1-ND |
| 1 | L2 | 490-12091-1-ND |
| 1 | PWR | 754-2118-1-ND |
| 1 | IC3 | LT1761IS5-5#TRMPBFCT-ND |
| 1 | U1 | LT6202CS5#TRMPBFCT-ND |
| 1 | IC1 | 568-5045-1-ND |
| 2 | ANT+LO | CON-SMA-EDGE-S-ND |
| 1 | FREQ | 609-3234-ND |
| 1 | JMP1 | S9337-ND |
You will need some other things of course, and John has prepared a list of them too.
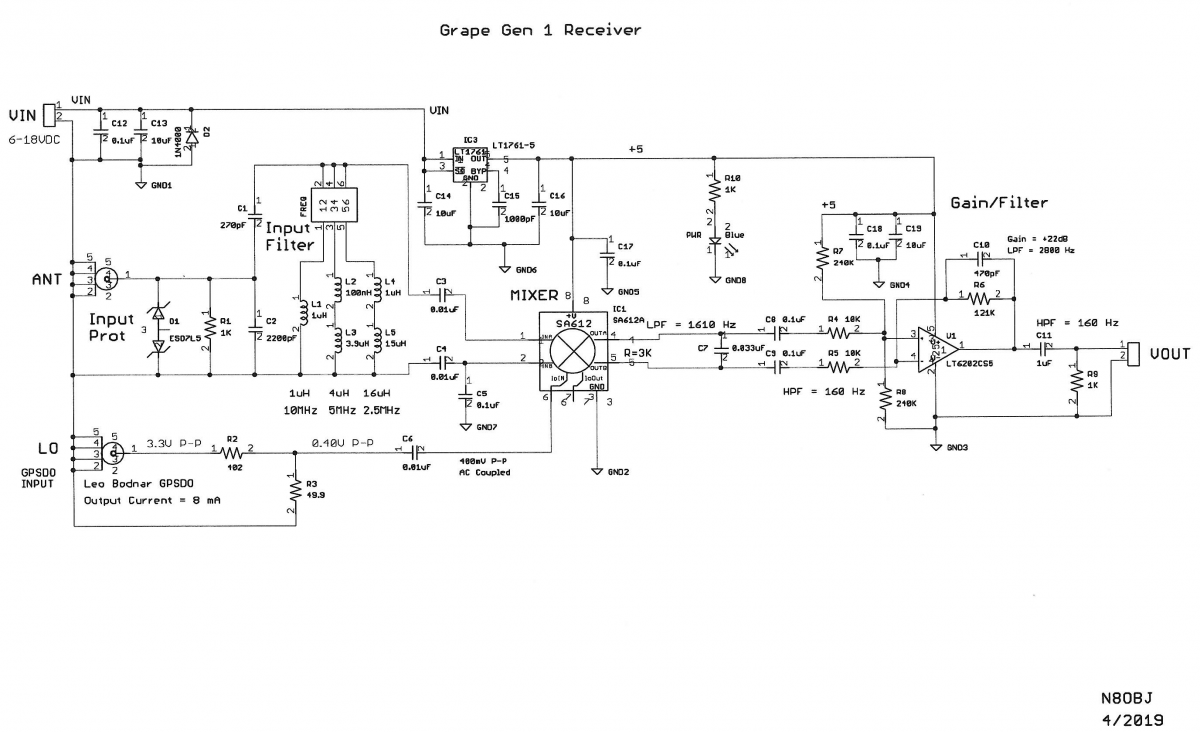
Schematic
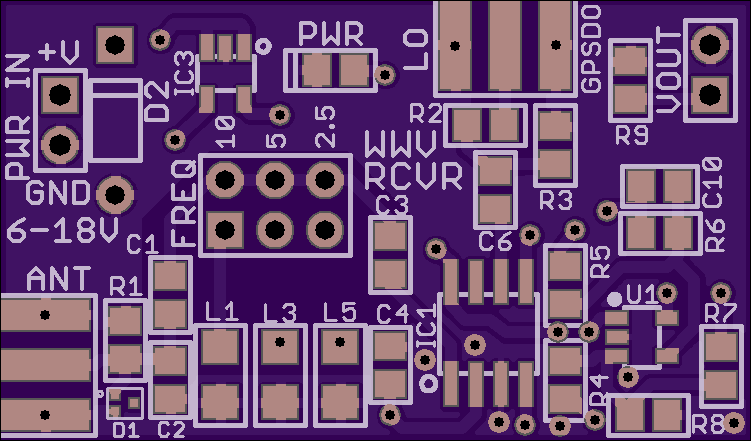
PCB Top
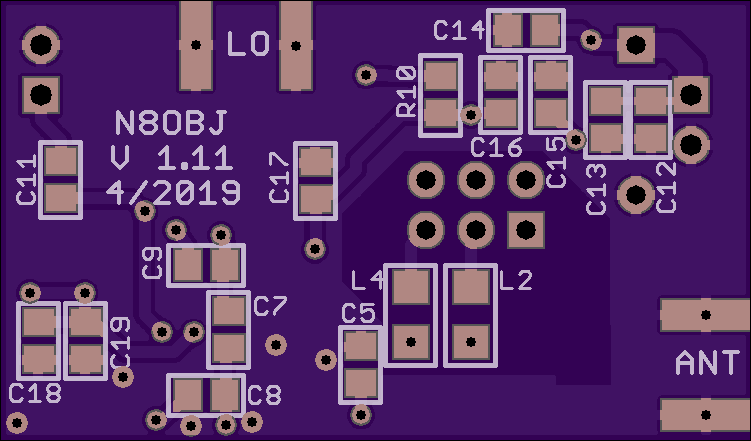
PCB Bottom
Submit Data Here
Please upload your .CSV and (optionally) .PNG files here at your leisure. Real-time uploading is in development.
Grape Datasets
Data can be found at www.doi.org/10.5281/zenodo.6622111. For visualization tools, please refer to https://essd.copernicus.org/preprints/essd-2022-303/.
We are still organizing our data storage systems, but here are some long-term datasets to consult. Please contact hamsci@case.edu if you would like to use these data in a publication.
Each file contains individual metadata.
"Seedless Grape" de AC0G